Since I am going to use Cloud Functions For Firebase a bit more in coming posts on this blog, I am going to give a very brief overview of how you can use and test them.
What are Cloud Functions for Firebase
Cloud Functions is a node.js based offering where you can expose stateless services. You can use it to react to certain Firebase events (not covered in this post) or to react to http events. They are more or less the same as Google Cloud Functions but are triggered by other events. Of course you have access to all those other Firebase services from within Cloud Functions for Firebase.
Warning: I am only describing functions triggered by http. I do not deal with the realtime database or the storage triggers and so on. If you're interested in the full list of possible triggers, see the official documentation.
Setting Cloud Functions up
First of all: You need npm installed. npm is a package manager for Javascript modules and (command line) tools. It's part of the node.js ecosystem - and thus you install it by installing node.js. I assume you have node.js and npm installed. Otherwise go to the node.js website and click on the big download links to install it (or use the respective Linux or OS X tools for installing packages). Make sure, you use the LTS version - the newest version is not supported by Firebase.
Install the Firebase command line tools
After you have npm installed, you need to install the Firebase tools. If you're using Firebase Hosting, you should have those tools already installed. If not, simply install them using npm:
npm install -g firebase-toolsYou can use the same command to update the Firebase command line tools later on. Since Google updates them frequently, Google recommends to use the latest version. So even if you already have them installed, you might want to update.
To check which version you're using, use
firebase --versionAuthorize the firebase command line tools
The next step is to authorize the command line tools to use your credentials. Start this process by using
firebase loginThe tool asks whether you want to provide anonymous stats and afterwards starts the browser (should this not work automatically, it prints a rather longish URL to copy into your browser). As usual you get a list of things the command line tools need to do and you can grant the necessary permission to do so, by clicking "Allow".
Initializing project
If you want to create a new project in the web-based Firebase Console, now would be the right time to do so. Afterwards switch back to the command line.
Unless you haven't done so already, you should switch to the folder in which you want to create your Cloud Functions for Firebase project. Within this folder create the project by calling
firebase initYou will see something like this:
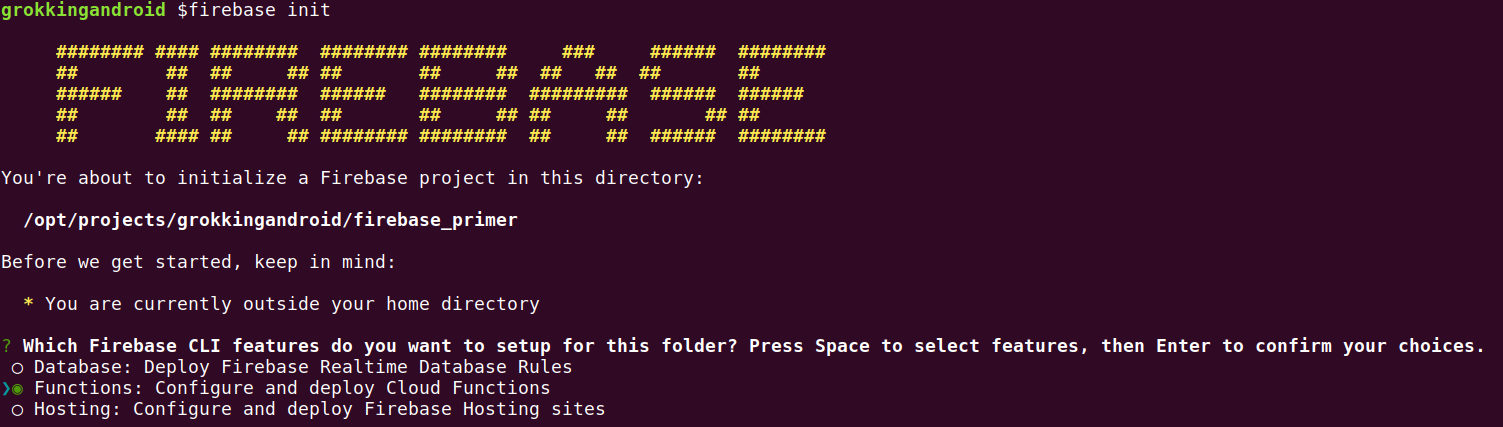
You can navigate to the second option using the up/down keys on your keyboard and then select "Functions: Configure and deploy Cloud Functions" by pressing space when the arrow points to this option. With pressing space again, you can deselect selected options.
In the next step you have to select the Firebase project you want your Cloud Functions to be associated with. Again use your arrow keys and space to select the appropriate option. Even though there is a "create a new project" option, I recommend to create the project in the webbased Firebase console before running firebase init. You can abort the tool at any time with Ctrl-D or Ctrl-C.
Afterwards the tool creates the necessary project structure for creating Cloud Functions and deploying them to Firebase.
The Firebase command line tool creates the npm dependencies by default, but before it does so, it asks you, whether it should do so. I recommend installing the dependencies, you will need them anyway. So simply hit enter when the question pops up.
If you are using Sonartype or any other private npm repository, you shouldn't install the dependencies. Instead you have to change the created package.json file after the project has been set up, so that it points to your repository url.
Structure of a Cloud Functions project
After having set up the project the project structure looks like this:
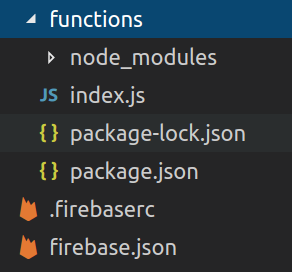
The top level folder contains relevant information for Firebase. The .firebaserc file for example contains the information to which Firebase project the function should be deployed.
The functions folder contains your Javascript code. The starting point for your project is the file index.js, though you might have more Javascript files than just this one. Within the functions folder there's also the file package.json, that contains information about how to package your project.
Finally there's the sub-folder node_modules that contains all the necessary dependencies of your project. Even without anything added by yourself, it contains already quite a lot of modules.
Signature of the called function
You need to add the firebase-functions module to your code and - obviously - the code of your function.
The bare minimum looks like this:
const functions = require('firebase-functions');

exports.yourFunction = functions.https.onRequest((req, res) => {
    // your code goes here
});
With this code, you export the function yourFunction. While I will cover deployment a bit down, for now it's enough to know that the firebase command line tool deploys all exported functions by default. You can use as many functions as you like within your index.js. Just remember to keep your code concise and tidy and consider using your own modules to keep the logic separate from your functions.
The req and res paramters are the same Request and Response objects you might know from Express - a very common framework to develop webapps with node.js.
With the Request object you can get more information about the request. For example you can get access to the headers and the body of the http request or to the the query string used for the request.
You need the Response object to generate the answer you want to send back to the client. You can set the statuscode, set headers and a body in your response.
I strongly recommend to use strict mode with Javascript. Otherwise Javascript is simply too forgiving, which will hurt you more often than not. One important thing strict mode takes care of, is to prevent your code from accidentally creating global variables.
With strict mode enabled and with making use of some features of the respective objects, the typical Hello World sample could look like this:
"use strict";

const functions = require('firebase-functions');

exports.yourFunction = functions.https.onRequest((req, res) => {
    let name;
    if (req.query.name) {
        name = req.query.name;
    }
    else {
        name = "World";
    }
    res.contentType("application/json");
    res.send(JSON.stringify({ "result": "Hello " + name }));
    res.status(200);
    res.end();
});
Unit testing a function
Unit testing Cloud Functions is not really a problem. You have to call your function and assert that it does what you want it to do. So basically you have to verify, that the res object is in the expected state after your function has been executed.
Bofore coding tests, you need to have the necessary test libs. I'm using Mocha for running the tests and Chai for testing assertions in a nice way using Chai's should assertion style.
I recommend to install Mocha globally and Chai locally:
npm install -g mocha
npm install -D chai
The option -D ensures that the lib is not packaged when you deploy your function, while still being available when running your tests.
Mocha expects test code to be within a subfolder named test. I consider this to be a good default and thus follow along. To get access to my system under test, I simply have to point to the parent directory, when importing the function:
const subject = require("../index.js")For testing the function you have to create mock objects for the request and response objects you pass into the function. If you use the realtime database, storage or anything else from within your functions, you have to mock these as well. You could use Sinon for that, but Javascript makes mocking very easy. So sometimes that's not even necessary.
For example I create a mock status() function on the response object, since I set the status using this method in my code.
"use strict";

const chai = require('chai');

describe("Sample Functions", function () {
    const subject = require("../index.js")
    let req;
    let res;
    chai.should();

    beforeEach(function () {
        req = {
            "query": {}
        };
        res = {
            "shadow": {
                "statusCode": 999,
                "noOfEndCalls": 0,
                "contentType": ""
            },
            body: {},
            contentType: function(contentType) {
                this.shadow.contentType = contentType;
            },
            status: function (statuscode) {
                this.shadow.statusCode = statuscode;
            },
            end: function() {
                this.shadow.noOfEndCalls++;
            },
            send: function(bodyText) {
                this.body = JSON.parse(bodyText);
            }
        };
    });

    it('someFunctions should return Hello World in body json', function () {
        subject.yourFunction(req, res);
        verifyCommonResults(res);
        let expected = { "result": "Hello World" };
    });

    it('someFunctions should return Hello Assistant in body json', function () {
        req = {
            "query": {
                "name": "Assistant"
            }
        };
        subject.yourFunction(req, res);
        verifyCommonResults(res);
        let expected = { "result": "Hello Assistant" };
        res.body.should.eql(expected);
    });

    function verifyCommonResults(res) {
        res.shadow.statusCode.should.eql(200);
        res.shadow.noOfEndCalls.should.eql(1);
        res.shadow.contentType.should.eql("application/json");
    }
});
If you installed mocha globally, you can now run the test using
mocha testAnother option is to define a script section at the root level in your package.json file and use npm test to run your tests instead:
"scripts": {
  "test": "mocha test"
}
Mocking outbound http calls
An important thing is to mock outbound traffic if you connect to an external endpoint. For this I use Nock. Nock is very powerful and comes with a good documentation about all of nock's options. A very simply example looks like this:
var nock = require('nock');
var api = nock('http://myexternalapi.com')
    .get('/mytestpath/')
    .reply(200, '{"dummy": "Hello World"}');
The next request to http://myexternalapi.com/mytestpath/ would then be answered with the Json specified.
Running a function locally
Before deploying a function you should test it locally. The command firebase serve does just that:
firebase serve --only functionIf you forget to add the --only function part, you will get a rather useless error message:
"Error: An unexpected error has occurred."Alas, starting the local server is not really a very fast option. You have to wait a few seconds until a localhost URL is printed for your function. After that, you can use it - either by loading the URL in your browser, using Postman or by using curl.
There won't be a log file, but any console.log() output of your code will be printed directly to the command line. Not perfect, but sufficient for local testing.
Even though the local deployment is too slow for my liking, it really helps detect flaws - especially in the begining, when you're not entirely sure what your mock request and response objects should look like. I strongly recommend to test locally before deploying to the Firebase cloud.
Deploying a function
The deployment of your function is easily done by using this command:
firebase deploy --only functionsThe tool checks if the project has been set up correctly and is backed by a Firebase project in the cloud, then zips your project and uploads it. Finally it prints the URL at which your function can be accessed.
The deploy tool also prints the URL to the project console. You can use the project console to see how often each of your functions was executed, to see the logs and to see the total number of invocations. Depending on your plan this might be important information for your billing.
For accessing the logs you might prefer the command line option:
firebase functions:log --only yourFunctionThe --only yourFunction part limits the output to the lines that belong to this specific function. You can also omit this option, in which case you get all the logs.
Wrap up
So with this, you should have a good understanding of what Cloud Functions for Firebase is and how to use it. And - very important - how to properly test the functions you deploy to the Firebase cloud.
I am going to use those functions in my upcoming tutorials about developing apps for the Google Assistant. But all in all they can be used wherever a stateless service makes sense. Depending on your workload and your use case, serverless computing can be a very cost-effective solution since you pay exactly for what you need.
Until next time: Happy coding!