In today's post I'm going to show how to develop a simple app for the Google Assistant. For developing this app, I will be using the Actions SDK. My next post will use Dialogflow (formerly api.ai) instead. After reading both posts you hopefully will know enough to decide which approach is better suited for you.
About the app
In my home town I usually take the bus when taking our youngest to kindergarten before heading off to work. In winter and also due to some long-lasting street works, one of the two lines near our home is quite late all the time. But naturally unreliably so. So I wonder every morning when to leave for the bus. We do have an app for bus information in Münster - but some limitations of this app make it not really suitable for the task.
Thus an assistant app that tells me when the next busses are due and whether we should hurry up or whether we can idle around a bit more is what I'm going to build. The first version in this post with the Actions SDK. Then in the next post an improved version with Dialogflow.
Here's a sketch of what a conversation with this app should look like:
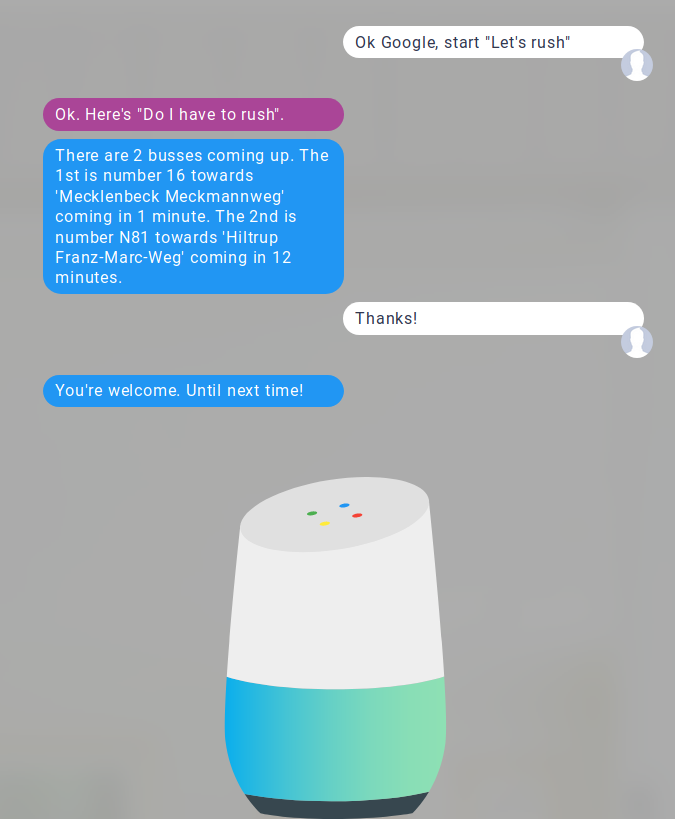
On the right is what I'm going to speak. On the left are the assistant's answers. The first is by the assistant itself - I changed the color for that one to emphasize the difference. The second and third are responses of the app. After the last response the app finishes - and with this also the current assistant's action. Thanks to botsociety.io, you can even see this website showcasing this prototype.
What is the Actions SDK
The Actions SDK is one way to develop apps for the Google Assistant. As the name of the SDK implies you can create actions which basically are speech snippets of your user and your response to them. Let's go a bit more into the base concepts here.
The relevant things you need to know are:
- Actions
- Intents
- Fulfillment
Actions
An action is a wrapper combining an intent and the fulfillment for this intent. For a truly conversational app, where there's a dialog between the user and the assistant, apps have multiple actions. But often it makes sense to create a one-shot app. In this case the app has only one action and answers directly with the response the user is looking for. The sample app would work well as a one-shot app. I only added one more action to make it a better sample for this post.
Intents
We already know intents from Android. And with Actions on Google they are not much different. An intent specifies what the user intends your app to do.
In contrast to Android, though, you are very limited when it comes to intents with the Actions SDK.
Every app has to define one actions.intent.MAIN intent, that is used to start up your app, if no custom intent is better suited to the invocation phrase. Depending on your kind of app, this intent might directly provide the answer and then stop the app. Or it might kind of introduce the app to the user in some way.
For the start of your app you can also define custom intents and which user utterances trigger that intent. You might even add some parameters to that (for example numbers or a date). And if the Assistant detects that one of those phrases was used by the user, it starts up your app using this intent.
If you were to build a more complex app with the Actions SDK, you would use one intent most of the time: actions.intent.TEXT. Meaning: You have one intent that has to deal with nearly all possible user input. And thus your app would have to decide what to do based on the text spoken or typed in by the user.
There are a few more intents available. For example android.intent.OPTION which is useful if you provide a set of options to the user of which she might select one. But when dealing with user input most of the time you would have to deal with actions.intent.TEXT.
This limitation is the reason why I've written in my intro post about the Assistant, that the Action SDK is mostly useful when you are proficient with natural language processing or have a simple project with a command like interface.
Unless you have some language processing super powers it boils down to this:
⇨ Use the Actions SDK for one-shot apps. These are apps that provide the required answer directly after being invoked and then stop. They give you just this one result. A typical example would be setting a timer to ten minutes.
⇨ For all other apps, for those that are really conversational, where there are multiple paths to follow and where you want your user to provide more information during the conversation, I recommend to use Dialogflow (api.ai) instead of the Actions SDK. I will cover Dialogflow in my next post.
Fulfillments
Fulfillment is just another word for your backend. Every action must be backed by some backend of yours. This is where you generate the text spoken to the user. Or — on devices that have a graphical user interface — that's where you create visual cues for your user.
Of course the response is based on which intent was triggered and what additional cues the user gave in her question.
When Google calls your backend, it provides a Json file that contains plenty of information as you will see later in this post. Some of the things you get access to:
- The spoken text as Google has detected it
- The intent invoked
- The parameters to the intent
- The session id
- Information about the device's capabilities
In this post I'm only going to make use of some of them, but I'm going to cover more aspects in future posts.
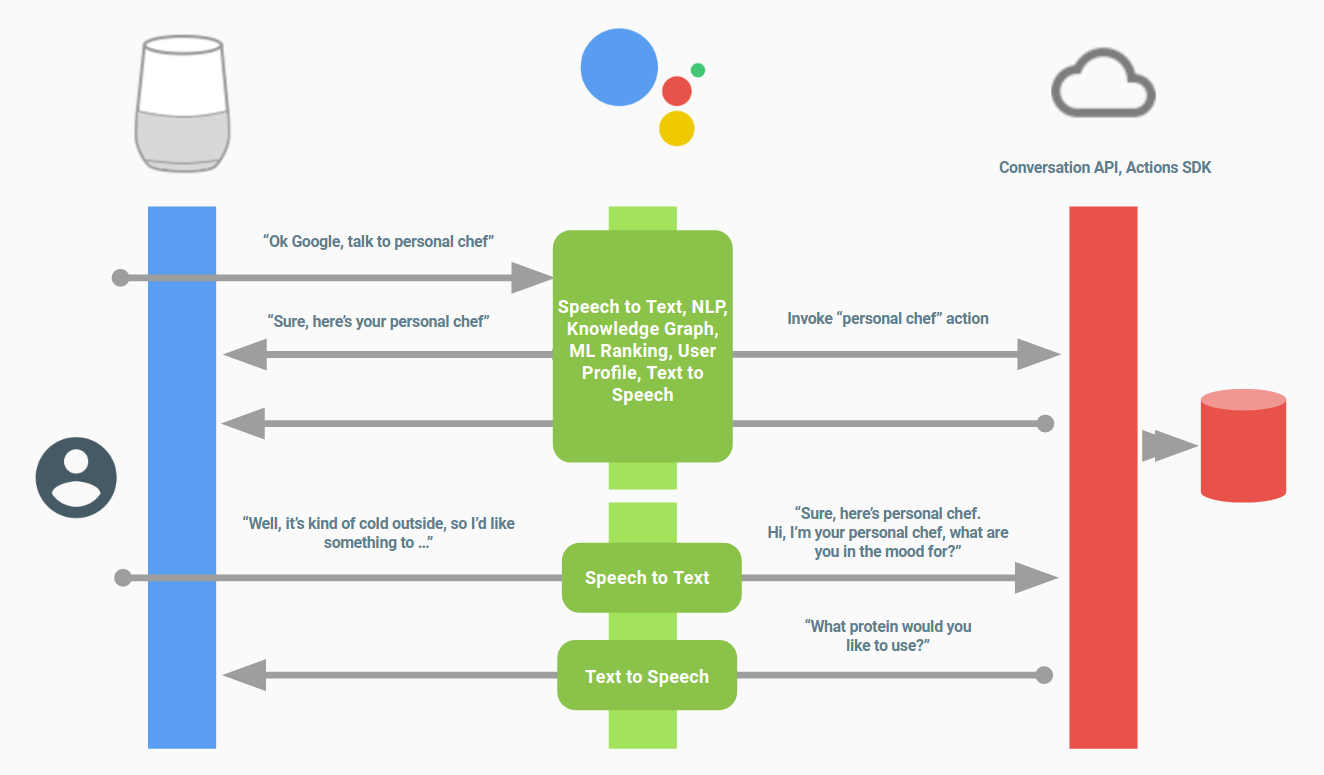
The next picture shows where your app — or more precisely: your fulfillment code — fits into the overall picture. The assistant knows which app to call based on the invocation phrase used by the user. It also provides voice recognition of the user utterances and text to speech transformation of your answers to the user. Your app then takes the recognized text and creates an appropriate response for that.
Preparations
When you want to use Actions on Google your account must be prepared for that. You have to do three things:
- Create a project within the Actions on Google Dev Console
- Install the
gactionscommand line tool - Initialize the project using the
gactionstool
In the next paragraphs I'm going to cover those steps.
Create a project within the Action on Google Dev Console
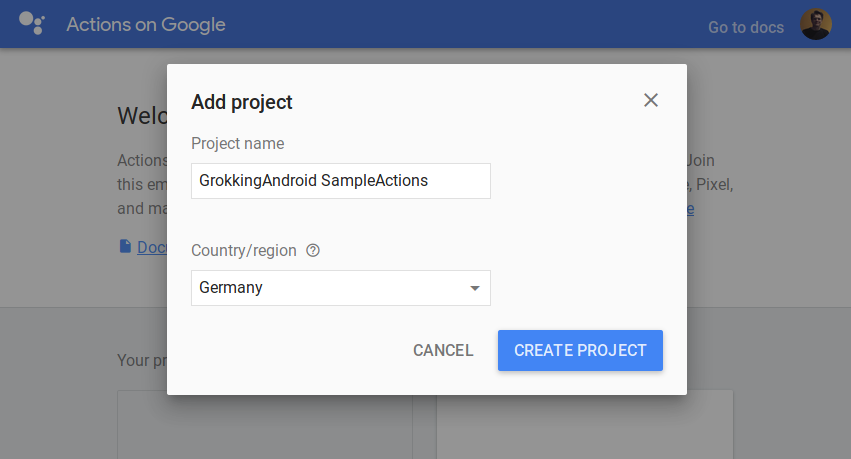
The very first step is to use the Dev Console to create a project. If it's your first project check the terms of the services - since by clicking the "Create Project" button you signify to adhere to them:
Afterwards you have to decide which API to use to build your project:

As you can see, there are three prominent ways to develop apps: The Actions SDK or one of the two services Dialogflow or Converse AI. If you click on "Actions SDK" you will see a tiny popup where you can copy a gactions command. So the next step is to install the gactions command line tool.
Install the gactions command line tool
You can download the gactions tool from Google's site. It's a binary file you can store, wherever you see fit. Make sure to make this file executable (if you're using Linux or Mac OS X) and - since you're going to use this tool a lot - I recommend to add it to your PATH.
If you already had this tool installed, you can use the selfupdate option to update it:
gactions selfupdateThat's all that is needed in this step 🙂
Initialize the project using the gactions tool
The last step is to simply initialize your project. Afterwards you're set to start developing actions using the Actions SDK.
Simply create some folder in which you whish to create the project and then switch to this folder.
Within this folder enter
gactions initIf you have never run gactions before, it will require authorization to access the Actions Console. Simply follow the steps outlined on the command line. After pasting your authorization code into the command line, Google gets your access token which is used for all subsequent communication between the gactions tool and the Actions Console. If you ever want to use another account, simply remove the creds.data file.
The gactions init command will create a file named action.json. This file contains the configuration of your project. In it's current state it's content is not valid. It contains plenty of <INSERT YOUR ... HERE> markers. You are going to fill those in in the remainder of this post.
With this you have finished the preparations and are good to go. So let's start creating an action.
The config file explained
Let's start by looking at the actions.json file that was just created for us:
{
    "actions": [
      {
        "description": "Default Welcome Intent",
        "name": "MAIN",
        "fulfillment": {
          "conversationName": "<INSERT YOUR CONVERSATION NAME HERE>"
        },
        "intent": {
          "name": "actions.intent.MAIN",
          "trigger": {
            "queryPatterns": [
              "talk to <INSERT YOUR NAME HERE>"
            ]
          }
        }
      }
    ],
    "conversations": {
      "<INSERT YOUR CONVERSATION NAME HERE>": {
        "name": "<INSERT YOUR CONVERSATION NAME HERE>",
        "url": "<INSERT YOUR FULLFILLMENT URL HERE>"
      }
    }
}
As you can see, some objects match the concepts explained above. At the top you have the actions object, which contains an array of action objects - each of which contains one intent. The second object is named conversations, which contains a map of conversation objects. I don't know why it's named "conversations", but basically this object covers the description of where to find the app's fulfillment.
You can see the full specs in the reference section for Actions on Google.
The config file of the sample app
The sample app has one intent to deal with the start of the app - the actions.intent.MAIN intent.
This app is a good example for a one-shot app - meaning it would provide the answer directly with the actions.intent.MAIN intent and finish itself directly after giving the answer.
To make this tutorial more useful, I've added the possibility for the user to acknowledge the answer of the app before it ends itself and gives the control back to the assistant. And - if the user didn't understand the answer - she can ask for a repetition.
Thus there is one intent of type actions.intent.TEXT that deals with both of these follow-up responses by the user and that also provides an answer in case the app doesn't understand the user's intention.
The resulting actions part looks now like this:
{
  "actions": [
    {
      "description": "Default Welcome Intent",
      "name": "MAIN",
      "fulfillment": {
        "conversationName": "do-i-have-to-rush"
      },
      "intent": {
        "name": "actions.intent.MAIN",
        "trigger": {
          "queryPatterns": [
            "talk to let's rush",
            "let's rush",
            "do i have to rush",
            "do i have to hurry",
            "start let's rush"
          ]
        }
      }
    },
    {
      "description": "Everything Else Intent",
      "name": "allElse",
      "fulfillment": {
        "conversationName": "do-i-have-to-rush"
      },
      "intent": {
        "name": "actions.intent.TEXT"
      }
    }
  ],
  "conversations": {
    "do-i-have-to-rush": {
      "name": "do-i-have-to-rush",
      "url": "<INSERT YOUR FULLFILLMENT URL HERE>"
  	}
  }
}
The intent represents the type of information the user tells the app. You first have to specify a name for this intent and then you have to define how this intent can be triggered by the user. So basically what the user has to say, in order for the assistant to select this intent.
As you can see from the Json above, the trigger contains an array of possible phrases. You can use it for custom intents - but also for the initial, the main intent. My sample app has the name "Do I have to Rush".1) But the user might use other phrases to trigger your app. In the prototype shown at the beginning of this post, I am using "Let's rush". And that is working as well because I added that phrase to the trigger section of the intent.
For actions.intent.TEXT intents you do not need to specify trigger phrases - since this intent gets called automatically for follow-up phrases of the user.
The above file is still incomplete. While the fulfillments link to a conversation, the conversation's URL is still not set. I will add that information after I've created the function in the next section. I am using Cloud Functions for Firebase - and the URL can only be set after deploying for the first time.
About time to delve into the fulfillment code.
The fulfillment code
In the config file you specified how many and which intents you have. In your fulfillment you have to provide the responses to these intents. That is: You tell the assistant what to say to the user and - if the device is capable of those - what visual elements to show the user.
For the fulfillment's backend I am going to use Firebase's Cloud Functions with Javascript. Please see my introduction tp Cloud Functions for Firebase and especially the section on setting up your Cloud Functions project to create the necessary files and project structure.
If you want to follow along set up your project as described in my previous post.2)
The Actions On Google Client Library
Google provides us with an Actions on Google client library for Javascript. For the code in this tutorial I'm making use of that lib.
Note that there is also an unofficial Kotlin port available. I haven't had a look at it, since I prefer to use Cloud Functions. Anyway: If anyone has experience with it, please let me know in the comments or on social media.
Assuming you have created the necessary structure with firebase init the next step is to add Google's library to your project.
The simplest way to do so, is to use npm install within the functions folder of your project:
npm install actions-on-googleYou will get a result telling you the number of installed packages. And your package.json file afterwards contains this additional dependency:
{
//...
  "dependencies": {
    "actions-on-google": "^1.5.0",
    //...
  },
//...
}
1.5.0 is the most recent version while writing this post. But when you read this, the newest version might very well have a higher version number since Google is eagerly working on everything related to the Google Assistant.
If you want to update to a newer version, you can update the version using
npm update actions-on-googleThe fulfillment function
When it comes to the actual function code, you have to do three things:
- Initialize the Assistant library
- Create a mapping from intents to functions
- Write a function for every intent
Your function after firebase init
You already should have code similar to this in your project if you set up Cloud Functions correctly:
const functions = require('firebase-functions');

/**
 * This function is exposed via Firebase Cloud Functions.
 * It determines the next busses leaving from the
 * closest busstop to our home.
 *
 * You normally create one function for all intents. If you
 * want to use more functions, you have to configure all
 * those fulfillment endpoints.
 *
 * Note: Your fulfillment must respond within five seconds.
 * For details see the blue box at the top of this page:
 * https://developers.google.com/actions/sdk/deploy-fulfillment
 */
exports.shouldIRush = functions.https.onRequest((request, response) => {
   // some generated stuff you can safely delete
}
Add the Google Actions on Google SDK
The very first step is to add your the actions-on-google dependency at the top and to create the ActionsSdkApp object within the function:
const functions = require('firebase-functions');
var ActionsSdkApp = require('actions-on-google').ActionsSdkApp;

/**
 * ...
 */
exports.shouldIRush = functions.https.onRequest((request, response) => {
    let app = new ActionsSdkApp({request, response});
    // ...
}
Note that you are using a specific part of the actions-on-google lib. You only need the ActionsSdkApp. In my next post about Dialogflow this will change and you will use the DialogflowApp instead. You must not forget the specific part you are interested in nor must you use the wrong one. One thing you need to know: In its samples, Google usually uses an ActionsSdk alias for the ActionsSdkApp class.
When you have added the lib and create the object, you can use the app object to query for information about the request and to provide the answer to the user.
Create the mapping from intents to your handler functions
As you've seen in the action.json file, the sample project has a main and an allElse action. So first, let's create empty functions for those two action's intents. Next we create a mapping from the two intents to these two functions. Note that the mapping is based on the intent name and not the action name. Finally call app.handleRequest() with this mapping to allow the lib to do it's magic:
exports.shouldIRush = functions.https.onRequest((request, response) => {
  let app = new ActionsSdkApp({request, response});
  //..
  function handleMainIntent() {
  }

  function handleTextIntent() {
  }

  // finally: create map and handle request
  // map all intents to specific functions
  let actionMap = new Map();
  actionMap.set(app.StandardIntents.MAIN, handleMainIntent);
  // all follow-up requests will trigger the next intent.
  // Be sure to include it.
  actionMap.set(app.StandardIntents.TEXT, handleTextIntent);

  // apply this map and let the sdk parse and handle the request
  // and your responses
  app.handleRequest(actionMap);
}
Write a function for every intent
Now I'm not going to show all I've done within those functions. I simply highlight some specific aspects, that are important to understand the Actions SDK.
For my intents I simply call the usecase:
function handleMainIntent() {
    console.log(`starting mainIntent - ${getDebugInfo()} - at: ${new Date()}`);
    usecase.callApiAndPrepareResponse(new UsecaseCallback());
}

function handleTextIntent() {
    console.log(`starting textIntent - ${getDebugInfo()} - at: ${new Date()}`);
    usecase.handleFollowUpPhrases(app.getRawInput(), new UsecaseCallback());
}
The usecase generates the response that the assistant should present to the user. With those texts it then calls the appropriate methods of the callback object. The callback object passed to the usecase is of this type:
class UsecaseCallback {
    answerNormalRequestSuccessfully(answerText) {
        app.ask(answerText);
    }
    answerNormalRequestWithErrorMessage(errorMessage) {
        app.ask(errorMessage);
    }
    endConversation() {
        app.tell('See you!');
    }
    reactToUnknownPhrase() {
        // If nothing matches, you might consider providing some help
        // to the user; I omit this for this simple usecase.
        app.ask('I\'m sorry, but I\'m not able to help you with this.');
    }
}
So sometimes I call app.ask() with a text and in one case I call app.tell(). Even though the former is named "ask" it doesn't necessarily mean it has to be a question. In my case the answer is presented using ask(). But ask() keeps the conversation alive. It basically expect another user reaction. The tell() method on the other hand doesn't expect a user reaction. In fact it closes the conversation and passes the baton back to the Assistant itself.
Of course there are more options available than just to ask or to tell, but I won't go into them.
From the code above you can see, that I also have a function to generate some debugging information:
function getDebugInfo() {
    // you can get some userId - but for getting the name, you would
    // need the appropriate permission.
    // be very careful what you use in production here;
    // logging too much can cause privacy issues
    return `user: ${app.getUser().userId} - conversation: ${app.getConversationId()}`;
}
While the usefulness of the userId depends on a few factors, the conversationId is nearly always useful. For one, you can use it to store conversation state on your backend. Since you only have limited possibilities to keep a conversational state with Actions on Google this id can be used as a key for that.
A second good use for the conversationId is for tracking down problems by using this id within all of your log messages and thus enabling you to join all log messages of one conversation together.
| Method / Attribute | Type | Use |
|---|---|---|
| ask | method | Presents text to the user and awaits a textual answer |
| tell | method | Presents text to the user and ends the conversation |
| getAvailableSurfaces | method | Returns a set of Surface objects. Those currently can be SurfaceCapabilites.AUDIO_OUTPUT or SurfaceCapabilites.SCREEN_OUTPUT |
| askForPermission | method | Requests the specified permissions from the user |
| getDeviceLocation | method | The location of the device or null if no permission has been requested/granted |
| buildCard | method | One of the many methods to present a visual output if the devices supports that |
| StandardIntents | object | Contains all available standard intents as constants (e.g. StandardIntents.TEXT) |
| SupportedPermissions | object | Contains all available permissions as constants (e.g. SupportedPermissions.NAME) |
Deploy the fulfillment function to Firebase
To deploy your fulfillment function, simply call
firebase deployTh deployment lasts a few seconds and when it's done, you get the function URL, you can use in the conversations section of the action.json file. Simply copy this url and replace the <INSERT YOUR FULFILLMENT URL HERE> placeholder with your url:
{
//...
  "conversations": {
    "do-i-have-to-rush": {
      "name": "do-i-have-to-rush",
      "url": "https://us-central1-gcloinudProjectId.cloudfunctions.net/yourFunction"
    }
  }
//...
}
Deploying an app to the Actions Console
If you have deployed your code to Firebase and configured your action.json file, all you have to do, is to deploy your app to the Actions Console.
Actually all Google needs, is your actions.json file - or files in case of internationalized apps. It's not as if you deploy code to the Actions Console. You only define your actions and where to find your code.
So to upload the newest version of your file simply issue this command:
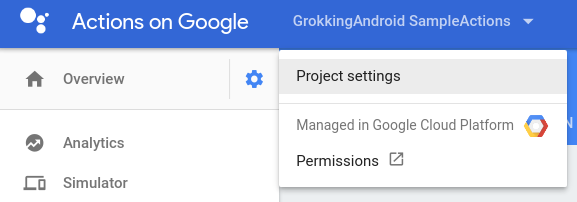
gactions update --action_package action.json --project yourActionsConsoleIdNow if you do not know the Action Console id anymore, simply go the the Actions Console, select the project and click on the gear icon. Then select "Project settings" to see the project id:
Testing the Actions SDK based app
Google provides a web-based testing tool for actions which is really a good way to test and demonstrate your app:

You can test your app also on your Google Home, your Android or iOS devices and on any other device that offers the assistant (for example the AIY based devices). To do so, those devices must use the same account and must match the locale of your test.
But before you can test, you must enable the test. The easiest way is to use the command line:
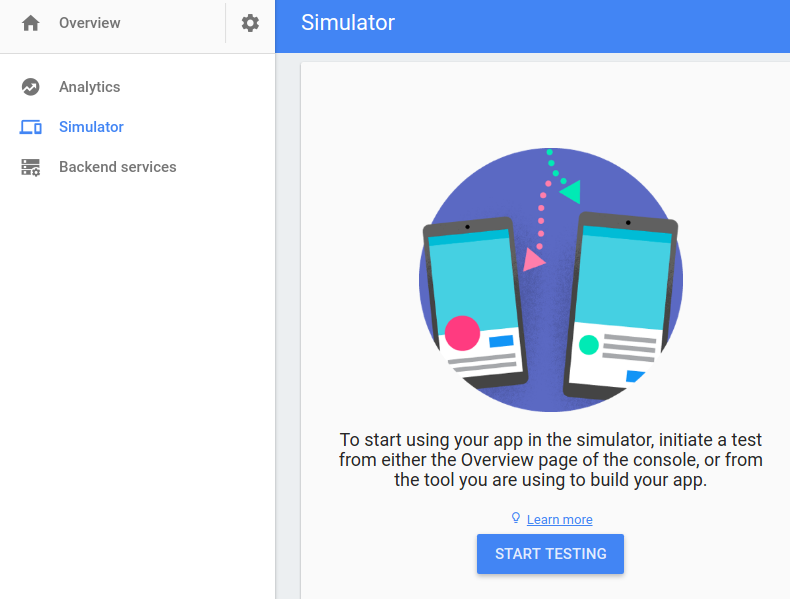
gactions test --action_package action.json --project yourActionsConsoleIdBut you can also enable testing in the Actions Console. Simply go to your project and click on the "Simulator" link in the menu on the left and than click the "Start Testing" button.
While writing this, I do not see this button for one project or get an error when trying to enable testing via command line due to a glitch on Google's side. As I've mentioned, Google is working a lot on Actions on Google. The downside of this is, that there are occassional hiccups. One this week, one last week. In both cases, though, the response by the Google team (alerted via the Actions on Google community on Google+) was quick and helpful.
Sample project
For more detailed code see my ActionsSDK sample project on github. On github you find the full implementation of the sample app outlined at the beginning of this post.
After cloning the sample project, you have to install all the packages. Switch into the functions folder of the project and issue the following command:
npm installThe project only contains the cloud function's code and the action.json file. So be sure to follow the relevant steps of this tutorial for deploying the function and deploying the project to the Actions Console.
Summary
Creating this project was fun. But it also made obvious the current limitations with the Actions SDK approach. To judge for yourself have a look at the timetable-usecase.js file. That's not the best and most flexible way to react to user phrases 🙂
Thus for anything other than one-shot apps I recommend to use Dialogflow. In one of my next posts, I'm going to improve upon this app by switching to Dialogflow.
Until next time!
Ok, Google dear reader, what's your take on this? What are you going to do with the Actions SDK? Please let me know.
Footnotes
| ↑1 | According to the invocation recommendations by Google, "Do I have to rush" is not a good name. You should try to find more concise and still expressive names for your projects. |
|---|---|
| ↑2 | In my sample app on github I am using outbound http traffic. As you can see on the pricing information for Firebase, you cannot do so with the cost-free Spark plan. So I've configured my project to used the Blaze plan, the pay as you go plan. Even with this plan you have a significantly sized free tier - meaning free invocations, free CPU usage and free outbound traffic that should be more than sufficient for getting used with the Actions SDK and using Cloud Functions for Firebase for testing purposes. But still: You must have billing enabled and you might run into costs. |