In this post I am going to write about the server-side of upstream messages with Google Cloud Messaging. This is the second part of my three-part series on this topic. If you haven't read the first part about the flow of events and the Android implementation of upstream messaging, please read that one first. The first sections of that post are important to understand the big picture of upstream messaging and the role of the server within it.
Sample project
I have created a sample project for the server side of upstream messaging with Google Cloud Messaging. Please note that this is a sample. It's not suitable for production!
Permanent connection and XMPP
Just recall the flow of events, described in detail in my first post:
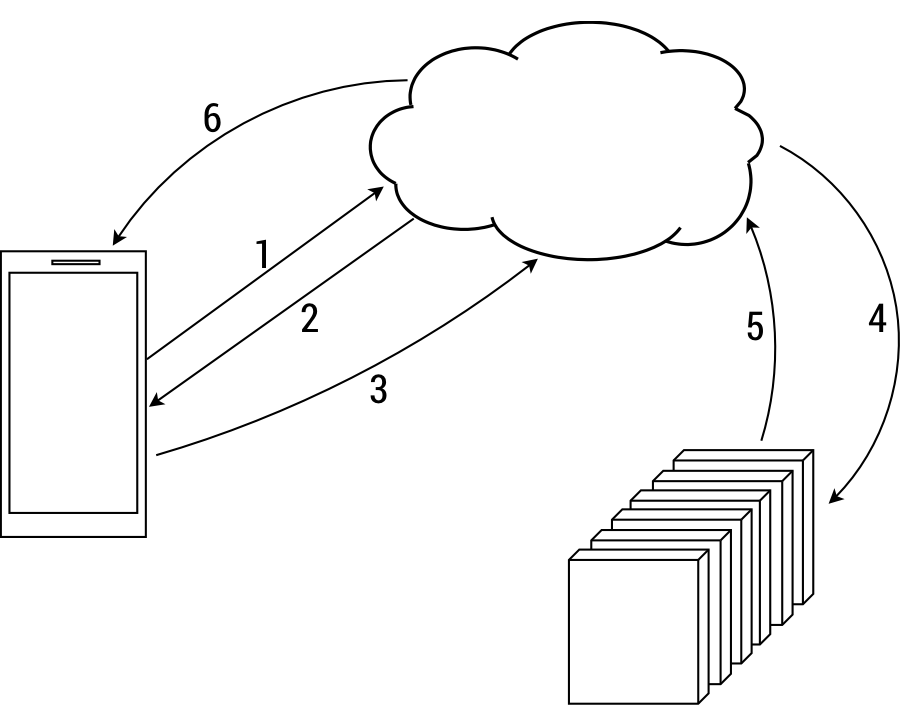
For this flow to work, Google must contact your server whenever the user sends a message from his device upstream to Google's cloud. There are many models of how to do that. The one chosen by Google is to require a permanent connection between your backend and one of Google's endpoints.
That's where XMPP comes into play. Google has chosen XMPP as the protocol of choice for communicating between its servers and your server. Google named its XMPP endpoint "GCM Cloud Connection Server" or CCS for short. XMPP is an XML-based protocol that was created for instant messaging (also known under it's original name Jabber). You can read more about XMPP on Wikipedia.
Server side code
In the previous post about upstream messaging you have seen that the Android side of GCM messaging is as simple as it can get.
The server side though is another matter altogether and got more complicated with the new solution.
First of all you're most likely not as familiar with XMPP as you are with HTTP. And you're not alone with it. HTTP is probably the most used application layer protocol. Thus the online knowledge base for HTTP is huge. Less so for XMPP. You probably have to search longer for solutions when hitting a stumbling block with XMPP.
This situation also applies to libraries. While there is an abundance of HTTP libraries, there are way less for XMPP. For Java I have found only one library that is still actively maintained: The Smack library, which Google also uses in its sample code.
Luckily Google has a very detailed description of all the message types exchanged between your server and Google's cloud. And since XMPP is text-based you could build a client on your own - no matter which language you use. Nevertheless I recommend to use a library for this - after all they not only ease your life but are also more heavily tested. It's likely that others already have found a solution for a problem that would otherwise bite you in production when writing your own code.
I have taken Google's sample code for XMPP and extended it to be more flexible and suit my needs. This code requires the Smack and the json-simple libraries. To repeat: The demo is there just to get you up and running, so that you can easily test the upstream messaging model and your Android code. It's still very basic and rough!
Logging messages
When setting up the connection using Smack's XMPPConnection, you can configure it to open a Swing window displaying all incoming and outgoing messages:
config.setDebuggerEnabled(mDebuggable);I set the flag to true when using the main() method of CcsClient. That obviously wouldn't work too well on a server so I made this configurable. From within my web project I set this flag to false.
There is another flag that configures if Smack logs every message:
XMPPConnection.DEBUG_ENABLED = true;Within the sample code I simply set this to true to see every message. Very handy for finding problems during development and appropriate for this demo project.
Implementing a server
These are the things you have to take care of:
- Establish the connection
- Authenticate your server app
- Receive messages from Google's cloud
- Send messages to Google's cloud
- Acknowledge messages
- Deal with problems
Since all message types are described in detail on Google's Cloud Connection Server page, you can use whatever solution you like. The following code samples are in Java and make use of the Smack library. While some stuff is from Google's sample code, some contains additions and abstractions around that sample code.
The most important class is CcsClient. This class is responsible for logging in to the server, sending messages to Google's Cloud, receiving incoming messages and handling ACKs and NACKs correctly.
Connect to the GCM Cloud Connection Server
For the permanent connection you open a TLS secured connection to gcm.googleapis.com at port 5235.
Within CcsClient the method connect() handles this. It needs a ConnectionConfiguration object.
Here's how to set up the ConnectionConfiguration:
config = new ConnectionConfiguration(GCM_SERVER, GCM_PORT);
config.setSecurityMode(SecurityMode.required);
config.setReconnectionAllowed(true);
config.setRosterLoadedAtLogin(false);
config.setSendPresence(false);
config.setSocketFactory(SSLSocketFactory.getDefault());
In the first line you specify which server and which port to use. As mentioned these have to be gcm.googleapis.com and 5235 respectively. And you have to ensure to use Transport Layer Security (TLS). That's why you have to set the SSLSocketFactory.
Afterwards you can create a Connection object and use it to establish the connection to Google's servers:
Connection connection = new XMPPConnection(config);
connection.connect();
Authenticate your server app
Google needs to ensure that you are allowed to send messages via Google Cloud Messaging - and that you are allowed to send them to the clients you are addressing. For this Google uses a project id and an API key specific for that Google Cloud project.
I have detailed in my previous post about upstream messaging how to create a project and how to generate a server API key for that project.
With XMPP you do not send the API key with every request. Instead you authenticate your server app directly after establishing the connection.
In Java just use the Connection object you created in the previous step to log in:
connection.login(mProjectId + "@gcm.googleapis.com", mApiKey);Obviously you have to use the values created on Google's Cloud Console for mProjectId and mApiKey. You either pass them as arguments to the main() method of CcsClient or you call prepareClient() with the correct values - which I do from within my web project.
After logging in, you can send and receive messages.
Message formats
Before I will cover how to send or receive messages, I'm going to show you some typical messages sent either from your server or back to your server.
Incoming upstream messages
The following is a message as it shows up on your server when a user clicks "Register" in the Android client sample:
<message
      to="projectId@gcm.googleapis.com"
      from="devices@gcm.googleapis.com">
   <gcm xmlns="google:mobile:data">
      {
      "category":"com.grokkingandroid.sampleapp.samples.gcm",
      "data":
         {
         "action":
            "com.grokkingandroid.sampleapp.samples.gcm.REGISTER",
         "account":"info@openminds.de"
         },
      "message_id":"20",
      "from":"someRegistrationId"
      }
   </gcm>
</message>
This message is no different from any other message sent from an Android device. It is obvious that the message consists of an outer XML part and an inner JSON part. You can safely ignore the XML part. It's always the same and is only used since XMPP is an XML based protocol. What's important is the JSON part. The JSON object contains all the attributes you need to react appropriately to incoming messages.
All upstream messages contain the following attributes:
| Attribute | Meaning |
|---|---|
| category | Package name of the sending app |
| data | The payload of your app |
| message_id | A unique id you need later on to acknowledge the message |
| from | The registration id of the device from which the message was sent |
Obviously only your apps can send data to your server. But you can use the same GCM server for multiple apps. That's why the category attribute is needed.
The data attribute is where you can put all the stuff, that you want to transmit to your server. The value of the data attribute is a JSON object itself.
The registration id is sent with every message within the from attribute. It's a very lengthy string which you must use to map the data to the correct user.
ACK messages
The next section explains what's up with the ACK and NACK messages. For now, you just need to know what those messages look like.
An ACK message is the simpler of both and always looks the same:
<message>
   <gcm xmlns="google:mobile:data">
      {
      "message_id":"m-8238983812089683316",
      "message_type":"ack",
      "from":"someRegistrationId"
      }
   </gcm>
</message>| Attribute | Meaning |
|---|---|
| from | The registration id to which the message was sent |
| message_id | The id of the message, that is acknowledged |
| message_type | ACK or NACK - for ACK messages obviously always "ack" |
Incoming NACK messages
NACK messages come in two types. A stanza message always indicates a malformed message on your side. Stanza is the weird name used in the XMPP specification for the different kinds of XML messages that XMPP supports. Any other erroneous condition is handled by the second type of NACK messages.
Let me show you a stanza message first:
<message
      id="iUB3B-2"
      to="someProjectId@gcm.googleapis.com"
      type="error">
   <error
         code="400"
         type="MODIFY">
      <bad-request
            xmlns="urn:ietf:params:xml:ns:xmpp-stanzas"/>
      <text
            xml:lang="en"
            xmlns="urn:ietf:params:xml:ns:xmpp-stanzas">
            InvalidJson: JSON_PARSING_ERROR
                  : Missing Required Field: message_id
      </text>
   </error>
   <gcm xmlns="google:mobile:data">
      {
      "to":"someRegId",
      "delay_while_idle":true,
      "data":
         {
         "message":
               "Simple sample sessage"
         },
      "time_to_live":120000
      }
   </gcm>
</message>
The error element of the XML message contains the description of what went wrong. And the gcm element contains the complete message you have sent to the server. The descriptive error message together with the full message causing the problem makes it really simple to understand what went wrong. In this case, the message_id is missing. I won't go into detail for this type. You get those messages only, if you do not provide all mandatory attributes.
Stanza error messages should only happen while developing your app. What might follow later on are other problem types. Here is a sample message for other failure situations:
<message>
   <gcm xmlns="google:mobile:data">
      {
      "message_id":"m-4370299872608467243",
      "from":"invalidRegId",
      "error":"BAD_REGISTRATION",
      "message_type":"nack"
      }
   </gcm>
</message>
In this case the registration id you sent to Google's server is invalid. Note: You will also get NACK messages for as long as your sign-up form hasn't been processed by Google.
| Attribute | Meaning |
|---|---|
| error | A short error message |
| from | The registration id to which the message was sent |
| message_id | The id of the message, that is acknowledged |
| message_type | ACK or NACK - for NACK messages obviously always "nack" |
Outgoing messages to devices
The final message type is a message from your server to an Android device:
<message id="4icfN-5">
   <gcm xmlns="google:mobile:data">
      {
      "to":"someRegistrationId",
      "delay_while_idle":true,
      "data":
         {
         "message":"Test message to a registered device"
         },
      "message_id":"m-15",
      "time_to_live":10000
      }
   </gcm>
</message>
Some of the attributes for sending messages via the Cloud Connection Server are the same as with messages via Google's HTTP server. Others though are new and still others are missing. The following table shows a list of all possible attributes for sending XMPP messages to a device.
| Attribute | Meaning | Mandatory |
|---|---|---|
| collapse_key | A key indicating that only the last message of this type should be sent to a device when it comes online again | No |
| data | The payload of your app | No |
| delay_while_idle | A flag indicating that messages should be kept on Google's server if the device is inactive | No |
| message_id | A unique id you need later when dealing with ACK and NACK messages | Yes |
| time_to_live | The amount of time for which Google should keep the message around if the device is offline | No |
| to | The registration id of the recipient | Yes |
If you have used GCM in the past you will notice the to attribute. That's the XMPP replacement for registration_ids. And in contrast to registration_ids you can send a message to only one user. Which means that for a broadcast you have to iterate over all registration ids. See Google's documentation for details.
The delay_while_idle attribute tells Google that it should not send a message when the client device is not active. A value of true means that messages are kept on Google's server until the device is active again.
The collapse_key probably needs some more explanation. If a device is offline you do not want it to get swamped with messages when it goes online again. Instead you can use the attribute collapse_key to ensure that only the last message for this key gets delivered to the app. But note: You can use only four collapse keys at the same time. The collapse_key applies to messages not delivered right away because of an delay_while_idle flag, but also to messages than cannot be delivered because the device isn't connected at all.
You might have noticed that the data attribute is optional. Now at first this might sound like a pointless exercise. Why send a message without any data in it? But it depends on the purpose of the message. You can use a GCM message as a tickle. To simply notify your app, that there's new data on the server to download. Unless the app can download different types of data, an empty message would be enough. When such a message arrives, your app would try to contact your server and download what it has to know.
If you do not set a time_to_live value, the default is used. The default currently is four weeks.
Message acknowledgements
The GCM Cloud Connection Server expects your server to acknowledge each and every method it sends to you. Google states explicitly that you should never send a NACK!
Always having to acknowledge messages means you should be able to deal with those messages. Take care of exceptional conditions, that might come up at your end. Google will resend messages for which you fail to send an acknowledgement. So not acknowledging puts unnecessary burden on your server.
Here's what Google expects your server to adhere to:
For each device message your app server receives from CCS, it needs to send an ACK message. It never needs to send a NACK message. If you don't send an ACK for a message, CCS will just resend it.
Google sends back ACK or NACK messages for every message your backend sends towards Google's cloud. Google obviously is allowed to send NACKs. A NACK coming from Google means that you did something wrong - most of the time at least. For example you will get NACK messages for trying to send messages to registration ids that aren't valid anymore.
Google will also send NACKs if the service is down or in case an "Internal Server Error" occurred. In the first case you should simply queue the message to resend it sometime later. In the second case though, you are a bit on your own. Most likely resending should be fine since most other cases are handled with other exception codes. So most likely it's a problem on Google's end - but you cannot know for sure. Maybe the problem is caused by the content of your message after all. It might be a good idea to add an internal retry counter which you decrease with every transmission. At the very least log those cases and have a look at them.
Receive messages from Google's cloud
To handle incoming messages with Smack, you first have to register a PacketListener object with the Connection you created in the first step above. This object is responsible for all incoming traffic. See this slightly adapted version of Google's code:
connection.addPacketListener(new PacketListener() {
   @Override
   public void processPacket(Packet packet) {
      Message incomingMessage = (Message) packet;
      GcmPacketExtension gcmPacket =
            (GcmPacketExtension)incomingMessage
                  .getExtension(GCM_NAMESPACE);
      String json = gcmPacket.getJson();
      try {
         Map jsonMap =
               (Map)JSONValue.parseWithException(json);

         handleMessage(jsonMap);
      } catch (ParseException e) {
         logger.log(Level.SEVERE, "Error parsing JSON " + json, e);
      } catch (Exception e) {
         logger.log(Level.SEVERE, "Couldn't send echo.", e);
      }
   }
}, new PacketTypeFilter(Message.class));
And handleMessage() looks like this:
private void handleMessage(Map<String, Object> jsonMap) {
   // only present for "ack"/"nack" messages
   Object messageType = jsonMap.get("message_type");
   if (messageType == null) {
      // Normal upstream data message
      CcsMessage msg = getMessage(jsonMap);
      handleIncomingDataMessage(msg);
      // Send ACK to CCS
      String ack = createJsonAck(msg.getFrom(), msg.getMessageId());
      send(ack);
   } else if ("ack".equals(messageType.toString())) {
      // Process Ack
      handleAckReceipt(jsonMap);
   } else if ("nack".equals(messageType.toString())) {
      // Process Nack
      handleNackReceipt(jsonMap);
   } else {
      logger.log(Level.WARNING, "Unrecognized message type (%s)",
      messageType.toString());
   }
}
The PacketListener has just one method: processPackage() which takes a Packet as argument.
A data package - that is an upstream message coming from a device - is then delegated to handleIncomingDataMessage(). For my sample project I have modified Google's original code quite a bit. For one I use a CcsMessage object here that represents the incoming message.
Next I use PayloadProcessors to deal with the different type of messages. For every possible type of message I have a specific implementation of this interface to actually deal with the incoming message. You can of course replace this logic with whatever suits you.
What you do within those PayloadProcessors is very app-specific. The sample code just provides very basic implementations to give you an understanding of how to deal with messages. Hopefully your app has more to offer than my sample 🙂
Send messages to Google's cloud
To send a message to Google's Cloud Connection Server, you have to follow these steps:
- Create the JSON payload
- Create a Smack
Packetfor the message - Send the XML message to Google's cloud
Create the JSON payload
With json-simple you can create a JSON object from is a map by calling JSONValue.toJSONString(). Each key of the map corresponds to one JSON attribute. In the section about message types I have listed the possible attributes. With this you can first create the map:
public static Map createAttributeMap(
      String to,
      String messageId,
      Map<String, String> payload,
      String collapseKey,
      Long timeToLive,
      Boolean delayWhileIdle) {
   Map<String, Object> message =
         new HashMap<String, Object>();
   if (to != null) {
      message.put("to", to);
   }
   if (collapseKey != null) {
      message.put("collapse_key", collapseKey);
   }
   if (timeToLive != null) {
      message.put("time_to_live", timeToLive);
   }
   if (delayWhileIdle != null && delayWhileIdle) {
      message.put("delay_while_idle", true);
   }
   if (messageId != null) {
      message.put("message_id", messageId);
   }
   message.put("data", payload);
   return message;
}
Using this method creating a JSON string for sending a message is simple:
public static String createJsonMessage(
      String to,
      String messageId,
      Map<String, String> payload,
      String collapseKey,
      Long timeToLive,
      Boolean delayWhileIdle) {
   return createJsonMessage(
         createAttributeMap(
               to,
               messageId,
               payload,
               collapseKey,
               timeToLive,
               delayWhileIdle));
}

public static String createJsonMessage(Map map) {
   return JSONValue.toJSONString(map);
}
Create a Smack Packet for the message
Creating a Packet object is even simpler. Google's code makes use of the extension mechanism of Smack. Smack's extensions are handlers for specific message types. The code uses them for processing incoming as well as outgoing messages.
Google's inner class GcmPacketExtension is an implementation of Smack's PacketExtension interface.
It's method toPacket() creates an XML Packet, in this case it wraps the JSON with appropriate XML as required by XMPP.
Packet request = new GcmPacketExtension(jsonRequest).toPacket();Send the message to Google's cloud
If you have a Packet object you simply call send() on your XMPPConnection object that you created connecting to Google's server in step one.
My demo follows Google's sample code in combining the last two steps in the method send() of the CcsClient class:
public void send(String jsonRequest) {
   Packet request = new GcmPacketExtension(jsonRequest).toPacket();
   connection.sendPacket(request);
}
Sending to multiple recipients via Google's Cloud Connection Server
You cannot send a message to multiple recipients when using Google's Cloud Connection Server. Instead you have to send one message for every registration id you want to send a message to. That's why I added the message sendBroadcast() which simply iterates over all recipients:
public void sendBroadcast(Map<String, String> payload, String collapseKey,
      long timeToLive, Boolean delayWhileIdle, List<String> recipients) {
   Map map =
         createAttributeMap(null, null, payload,
         collapseKey, timeToLive, delayWhileIdle);
   for (String toRegId: recipients) {
      String messageId = getRandomMessageId();
      map.put("message_id", messageId);
      map.put("to", toRegId);
      String jsonRequest = createJsonMessage(map);
      send(jsonRequest);
   }
}
Note: There actually is one option to target multitple registrations ids with just one message. With user specific messages you can target all devices of one user. But you're still limited to one user only with this option. Since I'm going to cover user specific messages in my next post, I won't deal with this option here.
You can combine HTTP and XMPP
Google allows you to use HTTP at the same time as XMPP to send messages to devices. It's up to you if you want to use XMPP just to receive upstream messages of devices and to acknowledge those messages or if you want to use XMPP to talk to Google's Cloud Connection Server (CCS) for everything.
Actually there is one use case for which you have to use HTTP - at least at the moment. I very much hope that this will change when the final version of those new services is released for everyone. I will cover that specific use case next week.
One final thing
I have written most of the server code in preparation of my talk at the Dutch Android User Group meetup. As I have written in my previous post about Google Cloud Messaging, you have to sign up to use the new features like upstream messaging, XMPP or user notifications. After signing up, Google processes your request and some time later comes back with the approval. In my case the approval took a while and the preparation for the talk was in jeopardy.
Gladly Dennis Geurts offered to use his testing API key and project id for which he had signed up much earlier. A big thanks for that, Dennis!
Lessons learned
With this post I have shown you some aspects of the server side of Google Cloud Messaging using the new upstream messaging model.
You have seen the different message types, have heard of the need to acknowledge messages and how to receive and send messages using Smack's Java library for XMPP. Since XMPP is text based those code snippets should be easy to transform to any other language.
Together with the source of the demo project this post should get you on the right track to set up your own project.
If you want to start using Google Cloud Messaging, be sure to read the official documentation. I couldn't cover all in this post. Be sure to not forget the document about advanced topics. There is also a nice blog post by Ryan Oldenburg of Pushbullet about some thinks to keep in mind when using GCM. It might help you to avoid problems right away. For another perspective on the topic you might also want to read Antoine Campbell's Cloud Connection Server Tutorial.
One final problem: Right now I don't know any SaaS or BaaS provider to support the XMPP messaging model for Google Cloud Messaging. This is a serious limitation in my opinion - one which I expect to get much better when this model gets adopted more often and is published to all without approval process. Should you know of any provider supporting the new GCM model, please drop me a line.